Most people think the digital cameras histogram only shows you your exposure. Few realize that it can also tell you a lot about image quality.
Some of you may have heard the saying: “Exposing to the right“ But what does it really mean?
If I told you that the histogram was a graphical representation of your digital cameras sensor and the distribution
of tones in an image you would probably reply .........“Well So What!”
But if I told you you that, by understanding how it works, you could possibly increase the image quality of your
picture by another 10-20% then that might surprize you! Digital cameras can’t see as well as the human eye. Where you and I can see up to 16 stops of light and shade,
Black & White film can see around 11 stops (see diag. below), but the digital cameras censor, (like slide film) can only see around 5 stops
Even if this number increases as technology advances, the theory behind how to expose an image, based on the histogram is still sound.
What you must first understand is, the histogram is divided up into five bands of equal width. So you could suggest that each band represents one stop of dynamic range. If these bands all recorded the same amount of information, then life might be a lot simpler, but they don’t!
Instead 50% of the tonal values are recoded in the brightest stop of the histogram. (zone VII on our diagram) half as many in the second stop and so on.
With most digital cameras recording RAW images in 12 bit, this gives us 4096 potential tonal values in an image. If 50% are in the brightest stop, that = 2048 tonal values. In Zone VI the are 1024, Zone V = 512 Zone IV = 256 and Zone III only 128
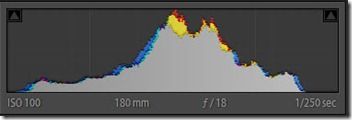
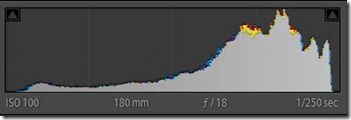
Up until now, many of us have been exposing, so our tone curve occupies the centre of the histogram as per histogram 1 on the left. But if you want optimum image quality, you need to push that histogram to the right in camera, to make maximum use of all that extra information as per histogram 2.
To do this you must shoot RAW. Focus and expose as per normal, then check your histogram. If it looks like histogram 1 dial in a 1/3 stop using the cameras exposure compensation button. Keep doing this until your highlight warning starts to flash on your preview image (make sure this is set to ‘on’ in the camera menu) and delete the last image as you will have burnt out highlights.
The remaining image may look washed out in your preview window, but this can be corrected later in Photoshop. Because there is less information in the lower values if you expose to the right you will avoid noise in the shadow areas.
Having the best file with the most information give the photographer the most choice as to how to process the image. If you want to maximise image quality, exposing to the right is the way to go.
If you want to learn more about exposure consider taking Nigel Hicks course Understanding Light & Exposure.
These great value for money photography courses offer you weekly online video tutorials, assignments based on that weeks lesson, you upload your work for feed back from your tutor and other fellow students and you get direct access to ask some of the world top photographer questions and advice.


